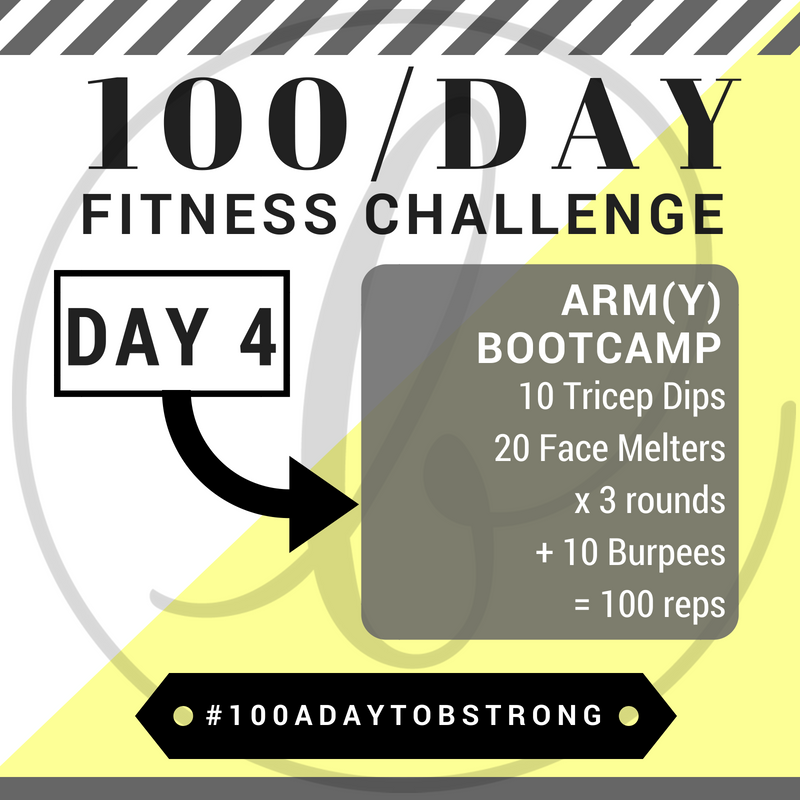
100 A Day to B Strong Fitness Challenge: Day 4

Day 4 is on a new level!! Get ready to get sweaty!! [LOL]
Here's what's on the docket:


  • Tricep Dips: work the back of our arms - our triceps - which also happen to be the largest muscle group in our arms! Why is that important? Want to build definition in your arms quickly [ahem, #sweatingforthewedding ;-)]? Better show your triceps some action 2-3x a week! Bent knees is easier, straight legs is more challenging. Be sure your to engage your lats, [I wrote all about this on yesterday’s post about avoiding neck pain during ab workouts!], & keep your elbows from bowing out to the sides as you bend & lower - keep them tucked beside your body so that they’re stacked over your wrists at all times!
  • Face melters: work your abdominals of course, but also get your shoulders BURNING from stabilizing a plank where your feet are elevated - but the burn is SO good! Again, keep your lats engaged - super challenging because your shoulders get so tired - but also isolate your legs! Try to keep your hips in the same are in space through the entire set - don’t let them rise & fall like your feet are!
  • Burpees: get that <3 pumpin ‘cause you’re jumpin! While the push-up is optional, the proper form isn’t: 1. when you jump your feet back to a plank, don’t let your lower back arch so your hips sag toward the ground! 2. when you jump your feet forward, land in a gorilla squat: both feet land just outside of their respective hand *with the soles of your feet completely flat on the ground* - landing on just your toes is not amazing for your knees. Move as slowly as is necessary to keep your form in check ;-)

Now there is a TON of plank action today, so if your wrists aren’t thrilled about it, keep reading to learn about how to prevent irritation!

  1. It’s all about alignment, baby ;-) When you’re in a plank, you should have a straight line from your shoulders to your elbows to your wrists... as well as from your shoulders to your hips to your heels. When those straight lines become curvy, your wrists will let you know immediately - LOL! One of the worst ones I see with exercises like mountain climbers & face melters is the shoulders moving forward & ahead of the wrists. This is bending them backward! OUCH! So when you’re moving in a plank, be sure to stay static - move in place.
  2. Engage your *whole* hand! Oftentimes, without even realizing, people will create a ton of torque in their wrist joint because they sit all the weight they’re holding up in the heels of their palms... like when you’re super fatigued & practically clawing your fingertips into the floor out of pure desperation hahaaa... So, intentionally press your entire palm & the ends of your fingers into the ground to engage the muscles that stabilize your wrists.
  3. Do it with your hands on a flat, hard surface. For some of us, the cushioning of a mat/rug may work against us when it comes to keeping our wrists properly stabilized. Go ahead & keep your knees over the mat, but walk your hands forward so that they’re on the flat, hard floor.

If these tips aren’t helping when you’re doing push-ups, go back to Day 2 to learn about how to maintain proper alignment specifically for the push-up ;-)

Hope that helps, fam!! <3

100 A Day to B Strong Fitness Challenge: Day 3

#100repsadaytobstrong Day 3 baby! And it’s a lovely, gentle workout that’s easy like Sunday mornin' ;-)

This workout feels amaaaazinggg if you have tight hips and/or tension in your lower back. Why? Because these exercises boost blood flow to that area of your body while bringing length to areas that commonly hold a lot of tension. The stretching + the heat from the blood flow doesn’t just feel good, it works WONDERS for your body in reducing inflammation & tension that causes pain.


  • Knee Tap Crunches: work your abdominals. Your focus here is to peel your spine up vertebrae by vertebrae until you can tap your knees with your fingertips. Avoid using momentum by throwing your head/arms forward!! Engage your lats, [if you’re not sure what that means, check out the Superman exercise from Day 2], & focus on using your abs!

Do you struggle with neck pain while doing core work? Read up below for tips on how to perfect your form so that abdominal exercises aren't a "pain in the neck"!

  • Side Laying Leg Circles: work your obliques & abductors, [outer thighs], while lengthening your hamstrings & adductors, [inner thighs]. For this exercise, be sure to always keep your working leg straight & to hinge your hips 👉🏼 torso is straight, legs are straight, but hinge at your hips so your body is in a wide V shape. Also, similar to the clamshells from Day 1, focus on using your abs & obliques to keep your hips stacked. No matter where your leg goes, your top hip shouldn’t budge!! In addition, only make your leg circles as big as you can without your knee bending or hips unstacking. The more flexible you are, the larger you’ll be able to make your circles.

WHY DO AB EXERCISES KILL MY NECK?!

  1. Check your posture! First off, pull your belly in & press your lower back toward the floor to prevent any arching in your lower back. But remember that your neck is also part of your spine! If it often aches while doing ab exercises, you may be sticking your chin out like a pigeon does when it walks [LOL] OR pulling your chin down to your chest. This hyperextends & fatigues the muscles that support your head. Instead, stabilize your neck & initiate crunching movements by lifting your shoulder blades off the ground. Your head is attached to your shoulders, so it’ll follow automatically ;-)
  2. Make sure you’re engaging your lats. This is CRUCIAL for every exercise EVER. To engage your lats, do the opposite of shrugging your shoulders: broaden them as you pull them down & away from your ears. If your lats disengage, your shoulders will collapse forward & lift toward your head, which creates tension in your neck, chest & shoulders. Pulling that tension down into your powerhouse is not only going to reduce tension in your neck, it’s going to properly load your abdominals so that you’re *actually* strengthening them with the exercise.
  3. Use your strength to control the movement at all times! Using momentum to crunch by throwing your head &/or arms forward is basically giving yourself whip lash LOL.. And letting gravity take over & just back-flopping onto the floor instead of lowering back with control is uncomfortable for obvious reasons. With these knee tap crunches, how much you crunch up is 100% dictated by your abdominal strength. Initially, you may only be able to lift your head & the top of your shoulders... but you’ll improve more quickly than you think - so long as you follow all the tips above ;-)

100 A Day to B Strong Fitness Challenge: Day 2

Happy Saturday! And welcome to Day 2 of #100repsadaytobstrong! AKA Arms & Abs Day 😬

If you can, try to flow from 1 movement to another without really stopping. Yep, that means holding the plank for all 15 shoulder taps & 20 mountain climbers with no rest between!! [I do this ‘cause ily & I want you to realize how badass you really are ;-)].

Here’s some info/tips on form:

  • Hand-Release Push-ups: core, chest & triceps. Head to the bottom of this post to learn more about proper push-up form & how to get better at them!
  • Superman Hold + Lat Pullbacks: I love supermans for strengthening your back & improving spinal mobility - b/c it’s important to bend without breaking, haha. Lat pullbacks are great for activating our lats - which tend to “check out” on us when we don’t deliberately move & use them. Not only that, SO many of us, [myself included], have cruddy scapular mobility - which can lead to tension/injury in our neck &/or shoulders. Training your shoulders to move smoothly through their full range of motion could save you a lot of aches, pains & frustrations in the future.

NOTE: when you pull your shoulders back during the lat pullback, get familiar with how you feel when your lats engage b/c you should feel those muscles engage, pulling your shoulders away from your ears & back toward your hips - anytime you’re doing a plank/push-up exercise!!!

  • Plank Hold + Shoulder Taps: right after working our scapular mobility, we focus on scapular & core stability. Because this is an *anti-rotation* core exercise, your focus here is to keep your hips square to the ground & avoid letting them twist when you lift your hand off the ground. A wide stance in your feet [1.5-2ft] helps with this, but moving your feet closer together is a great way to challenge your core if you’re feeling confident with the movement!!
  • Mountain Climbers: More CORE! Pay attention to your hips! Keep them at shoulder height or 1-2 inches lower & avoid poking your butt up to the ceiling/sky!

As you already saw, the very 1st exercise of the workout is push-ups. Yes, push-ups. Hate them? Wish you were better at them? Keep reading:

No matter what variation of push-ups you’re doing, remember that they’re a moving plank, so:

  • lats engaged

  • lower abs tight & butt squeezed to keep pelvis neutral

  • heels driving back so that all 5 toes press into the ground & quads engage

  • gaze at the floor

In this workout we’re doing hand-release push-ups. Why?? They’re an effective way to build up strength & practice proper form through the *full range of motion* of a push-up, [which you eventually want to do properly - without resting on your belly at the bottom ;-)]. Focus on lowering yourself so that your entire body reaches the floor at the same time - avoid letting your hips sag & touch the ground before anything else. Then reverse it! Press everything up all at once & avoid any worm-like action.

FYI! Another helpful way to build up strength if you struggle with push-ups, [the struggle is SO real btw], is to elevate your hands. The higher you elevate them, the easier. Start with your hands on a countertop; then progress to a bench/chair; then the bottom step of a staircase; then shoot for the real deal!

WHAT IF PUSH-UPS HURT MY WRISTS?! Elevating your hands is a great place to start. Also... press your fingertips into the ground. Letting all your weight rest into the heel of your palms creates a lot of pressure in your wrists.

⚠️ You should also make sure you’re placing your hands the proper width &/or aiming your elbows in the proper angle! ⚠️

The closer together your hands are, [the more you’ll engage your triceps], the more your elbows should aim backward & stay tight to your midline. The wider your hands are, [the more you’ll engage your pecs & anterior delts], the more your elbows should aim away from your midline. If your elbows are bowing out wider than your wrists, either tuck them closer to your midline or adjust your hands to a wider stance.

Aight, that’s all the secret sauce! Godspeed!!

100 A Day to B Strong Fitness Challenge: Day 1

Short on time? No gym membership? No problem!! For the entire month of June I'm providing you a workout every single day that adds up to a total of 100 reps for the #100RepsADaytoBStrong Fitness Challenge! Each workout will take less than 10-minutes. Most of them will take less than 5! You've got no excuses! So remember to check back here or on my social media profiles every day to complete your challenge ;-)

Here’s the tutorial for your Day 1 workout! And here are some tips on form:
 

Clamshells: bend your knees & hinge your hips slightly so that your body makes a zig-zag shape. Focus on keeping your hips stacked through the entire movement - don’t let your top hip roll back farther than your bottom hip when you lift your knee!! But open that knee as far as you can without your hips unstacking!


Glute Bridges: firmly press your feet down into the ground & squeeze your cheeks together like your life depends on it!! Just be mindful not to arch your lower back - keep your lower abs nice & tight to keep your pelvis in a neutral position.
LASTLY 👉🏼 remember to BREATHE!

This workout is great for *everyone*. Yes, everyone. [Listen up fellas!] These exercises should be staples for anyone who deals with issues such as:
✔️Poor Posture
✔️Low Back Pain/Tightness
✔️Tight IT bands
✔️Tight Hamstrings
✔️Hip Pain/Tightness
✔️Knee Pain
Glute Bridges work the big guy - your Gluteus Maximus. You should feel this right in the meaty part of your buns.
Clamshells work the top side of those sweet cheeks 😉 your Gluteus Medius. You should feel this exercise more toward the top of your booty, just behind your hips.


Pair these 2 exercises together a few times a week & you’ll build a butt that’s BIG. ROUND. And OUT THERE! #BabyGotBack [LOL]
Not only that! You can help to balance out your body & alleviate, [& possibly eliminate!], some of the aches & pains I listed above!! HOW SO?!?! Well, we spend way TOO MUCH time sitting - usually with poor posture --- back rounded over, shoulders & head collapsing forward. This can cause constant pulling & uncomfortable tension in our lower back that can ultimately travel to our hips, knees & all the way to our feet... On top of that, the average person’s daily activities neglect the posterior chain - back, butt & hamstrings - BIG TIME. So not only is our crap posture making us TIGHT, but our lack of activity is making us WEAK in our backside too.


⚠️ TIGHTNESS + WEAKNESS = IMBALANCED TENSION === PAIN/DISCOMFORT ⚠️ 


Plus, we sit on our backside constantly, so it’s often coping with lots of pressure that could inhibit circulation - boosting blood flow on a regular basis is important for that reason alone!!
Long story short: show your backside some action. It deserves love too ;-)

Momma B: Letting Food Be My Medicine & Medicine Be My Food

My whole life changed when I went from eating a Standard American Diet (SAD) to eating a Whole Foods Diet (WFD).  The transition wasn’t easy. The road was long and often difficult, but now that I’m enjoying the benefits of eating a WFD I can never see myself falling back into my old habits. There was a time when I thought my daily headaches, chronic migraines and feeling crappy all the time was my “normal” and completely out of my control. Thankfully, I learned that it wasn’t normal and that I was living with a lot of unnecessary chronic pain because I told myself that eating real, whole foods was both too challenging and hardly satisfying.

SAD cart :-(

Sugar, refined grains and processed foods are a huge part of the SAD. Sugar is a major culprit in the development of many chronic diseases. It causes elevated insulin levels, excess body fat around the waist, abnormal cholesterol levels and obesity. What’s worse is that it can be difficult to avoid sugar, even when you’re genuinely trying, because it goes by many different names. One you may recognize is High Fructose Corn syrup (HFC), and it can be found in just about everything these days because it’s cheap to produce. The issue is, HFC can only be metabolized by the liver, which causes a lot of serious health issues and can lead to metabolic syndrome. No matter how great the packing may make you believe the food is, anything that’s made with cheap ingredients like HFC has lost most of it’s nutritional value by the time it’s finished processing.

WFD cart :-)

Rather than looking for nutrients listed on the packaging of processed foods, you can get all the vitamins, minerals, protein and essential fatty acids you need by eating a diet that is rich in anti-inflammatory foods - dark leafy greens, beets, cruciferous vegetables, berries, spices, herbs, coconut, fatty fish, chia seeds and flax seeds. 

Over the last four years I’ve added many of these foods to my diet and it has dramatically changed how I feel - no more chronic pain and migraines! Don’t make your body wait any longer. Make today the first day of your journey on an anti-inflammatory, WFD. It could change your life too.